|
|
|
|
Subsummary Sandwich
|
Level: Beginner
Version: FileMaker 15
Category: Reporting
Tuesday, July 25, 2017 |
|
|
|
|
|
|
|
|
|
|
|
|
|
|
|
|
|
|
|
|
|
|
|
|
|
|
|
|
|
|
|
|
The biggest mistake I see amateur developers make is using relationships and calculations to create reports. They work great in single-user mode with test records. Put that same solution in a multi-user environment with thousands of records and performance starts to grind to a halt. Add a WAN into the mix and it degrades the speed even further. The same is true for dashboards which often use the same techniques. The aim of this article is to teach standard reporting methods for beginners and seasoned developers alike. While the topics include mostly beginner and intermediate subjects, we'll dive into a couple advanced examples at the end.
Best Practice
It's best to use the tools FileMaker, Inc. gave us for creating reports... whenever possible. Those tools are summary fields, subsummary parts and layouts. They are extremely flexible and powerful so I'm not sure why folks try to substitute aggregate functions and relationships. It's kinda like pounding a nail into the wall with the handle of a screwdriver. It'll work but it's probably easier to just reach for that hammer. Hopefully it's just ignorance. If that's the case then this article will show you how to create reports using the appropriate methodology.
I understand the use of non-standard reporting techniques in isolated situations. They do allow for layout format flexibility as long as the downsides are minimized. For example, cross-tab reports aren't possible with standard FileMaker reporting tools. You might think you can use standard reporting techniques and columns to make a matrix but if a category is empty (no records) then everything shifts to fill that blank area, throwing off the column headers. The alternative is using calculations and relationships or calculations and summary fields. Both can be slow and inflexible so I always try to convince my clients that a linear approach will get the the most bang for their buck.
The Story
I always like to include a story from my past experiences in these articles to keep it real. What keeps coming to mind is a story of a great client who couldn't let go of their old reporting system. It was a FileMaker 6 solution they asked me to convert to FileMaker 7. After looking over the solution, which I didn't program, I came to the conclusion that it had to be rewritten from scratch. There were too many files, too much copy and paste and upon conversion the relationship graph look like a bowl of spaghetti.
One of the main reasons for the relationship chaos was their reporting system. While it was really cool how they could popup a menu to change the report, the number of relationships required was astounding. I tried to convince them that the same reports could be created using a layout with subsummary parts and scripted finds but they had drunk too much kool-aid. I eventually told them I wouldn't work on the project unless they started from scratch because I felt it was going to fail. I haven't heard from that client since but I felt I did the right thing even if they didn't want to hear it.
Find and Sorts
In order to get the most out of subsummary parts and summary fields, it's important to be familiar with finds and sorts. A simple search can turn a single report into dozens of reports. For example, a sales report could become a weekly, monthly and yearly report simply by starting with a date range find. Those same three reports created with aggregate functions would require three separate relationships! Just think about the relationship clutter! FileMaker, Inc. has continuously introduced new features over the years in order to reduce clutter!
FYI: Filtered Portals, Script Variables, Conditional Formatting, Hide Object, Placeholder Text and many other features since FileMaker 7 was introduced were specifically designed to reduce relationship clutter.
The same is true for sorting since subsummary parts disappear when the break field attached to the part is not in the sort order. That means you can completely change how a report is organized by omitting sort criteria. Try that with non-standard reporting! With just two sub-summary parts and a script that varies the sort, one layout can create three very different reports. Combine that with a nearly endless number of finds and the number of reports from a single layout increases dramatically.
Context
Summary fields weren't designed for data entry layouts, despite the fact that so many developers insist on placing them there. They summarize all the records in the found set and can slow down navigation with their refreshing since they are unstored. Take this ability to a report layout and summary fields start to make more sense. Not only do they conform to the current found set but also the part where they are situated. That means they provide a different result inside a subsummary part (group summary) versus a grand summary part (all records summary). There's no need for multiple fields to total up each grouping as with non-standard reporting.
Parts
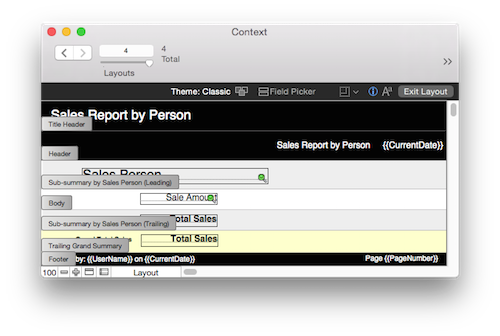
Each part on a layout performs a different role in a report. The Header and Footer parts place information at the top and the bottom of each page. Subsummary parts organize records into groups based on the attached field, often called a sort or break field. Grand summaries summarize all information at the beginning or ending of a report. The Body part, of course, shows individual record data but isn't used as often in reporting since the whole idea behind reporting is to summarize complex information, not provide detail.
Parts can be inserted three ways: using the part tool, choosing Part... from the Insert menu and via the Create... button in the Part Setup... dialog under the Layouts menu. Each method is slightly different. The part tool in the status toolbar can be dragged between parts and adopt existing layout real estate while the other two methods create new layout space. This is handy when you want to divide a part into two pieces with some objects going to each part. Believe it or not, this ability has saved me a ton of time. The Part... menu item has the least functionality, simply giving you access to a portion of the Part Setup dialog and plunking your part on the layout. At least the Part Setup dialog allows you to rearrange parts before committing them to the layout.
SIDE NOTE: When FileMaker 12 was introduced, I complained about them removing the part tool in the status toolbar, arguing it provided additional functionality over the other methods for creating a part. Glad I said something.
Page Breaks
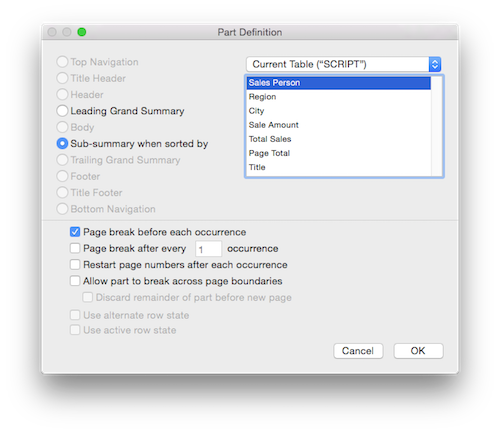
In most cases a page break before each occurrence of a subsummary will be sufficient to separate groupings of records, starting each new group at the top of a fresh page. The only time this fails is when there are two subsummary parts and the page break is attached to the inner subsummary part. This causes the outer subsummary to be placed on a page by itself. In this scenario, the page break should be attached to a trailing subsummary part using the "page break after every 1 occurrence" option. If no trailing subsummary part is available then add one with no content and make it only a few pixels tall, existing only to break the page.
Tops and Bottoms
Headers are good for titles. If you don't want a header on every page then employ a Title Header which appears only on the first page. If both a Header and Title Header are present, the Title Header will override the Header on the first page. Titles can be static text but with the ability to change reports with finds and sorts, a global field is often warranted so the title can be changed with a script to suit the report.
Footers are good for page numbering and date printed. I almost always include the date a document was printed so it can be placed in the context of time. Page numbers are helpful too. The most often asked question is how to get page totals (e.g. 4 of 10). It's actually quite easy with a simple script added onto the end of your standard print script. The idea is to enter preview mode, navigate to the last page and set a global field to the current page number. This global field should be inserted into the same text block as the page number symbol {{PageNumber}}. How you mix this code into your print scripts is up to you but I recommend a modular script since all the code is adaptive.

Summary Field Types
Summary fields come in eight flavors but only a couple are commonly utilized. My favorites are total and count with total as the clear winner. I occasionally use average, minimum and maximum. I've used the standard deviation options once or twice in twenty years of development. The fraction of total is helpful when calculating percentages,which will be covered later in this article) and the new list summary field is great for gathering all the values in the found set into a return-separated list. How a return-separated list is useful is the subject of another article.
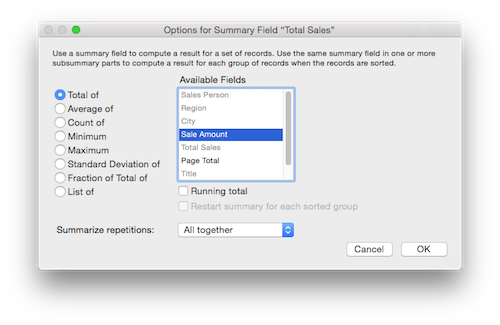
The options for running total is occasionally used but not as often as you might think. Most times management wants a total for each grouping and not a cumulative of the groups to that point. The "restart summary for each sorted group" only becomes available when "running total" is checked, for obvious reasons. Ignore the "summarize repetitions" option as any relationally sound database would not need to total repeating fields.
Browse vs Preview
Reports can viewed in browse or preview mode. The basic difference is preview mode shows records as they would appear on a printed page while browse mode is a continuous list. In order to view a subsummary report in browse or preview mode, it must be sorted by the break field. Additionally, browse mode requires the layout to be set to view as list or table.
Creating a Report
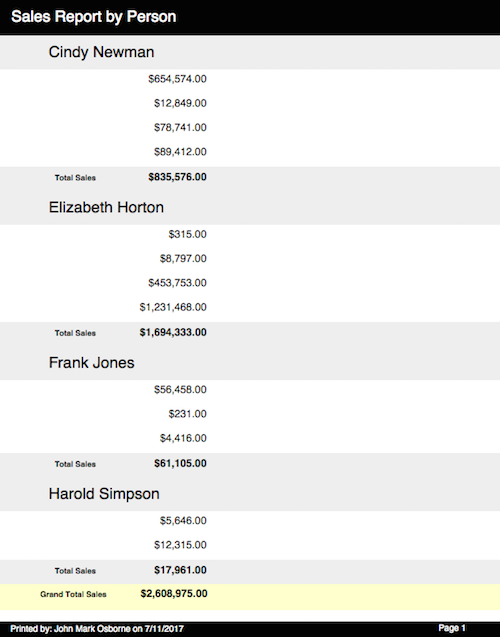
Nothing teaches better than an example. Let's use the information covered so far and summarize sales numbers by sales person. All you need is a subsummary part. That's right, just one part!
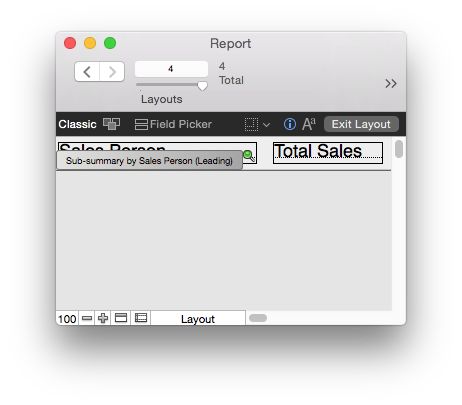
Place the field attached to the subsummary part in the subsummary part along with a summary field. The break field doesn't have to match the subsummary field contents. For example, you might break your subsummary part by the sales person foreign key, to avoid grouping two sales people with same name, but place the actual sales person name in the subsummary part.
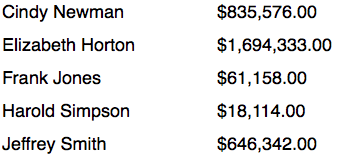
One simple change will provide a grand total. Just add a trailing grand summary part and duplicate the summary field. I don't mean duplicate the summary field in Manage Database. Just duplicate it in layout mode. Summary fields are context sensitive and will provide a different result depending on the part where they reside.
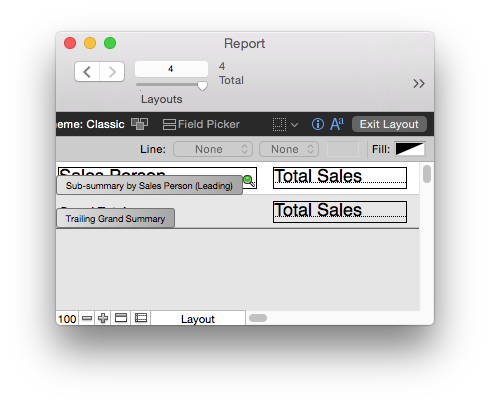
Underlines are the traditional method for specifying a grand total but I prefer coloring the part to maker it stand out!

Adding Percentages
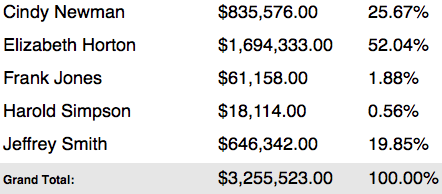
Adding a percent of the whole to a report seems out of reach until you understand that combining the Fraction of Total summary field and formatting from the Inspector is all that is needed.
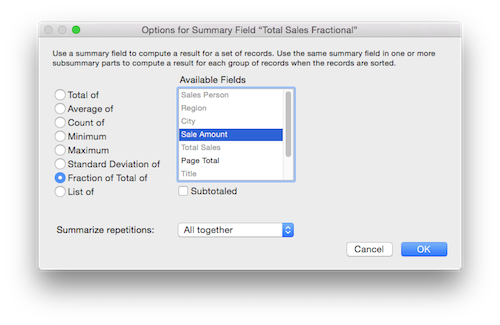
Choose the Percent option from the popup menu in the Data Formatting section of the Inspector to get a percentage.
GetSummary
One of the first functions I had trouble tackling twenty long years ago, when I worked in Claris technical support, was the GetSummary function. I just didn't understand the purpose. I had to learn the hard way but with a good example, it's actually quite easy to understand. Let's say you want to get a percentage of sales quantity instead of dollar amounts. This won't be possible with the Fraction of Total summary field since it only works with "Total of" summary fields. Instead, it's best to employ the GetSummary function which allows subsummary break values to be incorporated into calculations.
Normally, a summary field in a calculation simply results in a total for the found set. If you place the summary field and break field into a calculation using the GetSummary function, it will provide the same results as a summary field in a subsummary part.
GetSummary(Count Sales; Sales Person) / Count Sales

The GetSummary calculation has been purposely omitted from the Grand Summary part because it is not part sensitive since the break field is included in the formula. Besides, we all know it's going to add up to 100% anyhow.
Multiple Subsummary Parts
Adding a second subsummary part is pretty easy. Let's add an additional grouping by city by adding a subsummary when sorted by the city field.

To view the report, just sort by both the city and sales person fields. If you decide you want to see the report just by sales person again, just omit the city field from the sort. If you want the sales organized by city only, omit the sales person field from the sort.
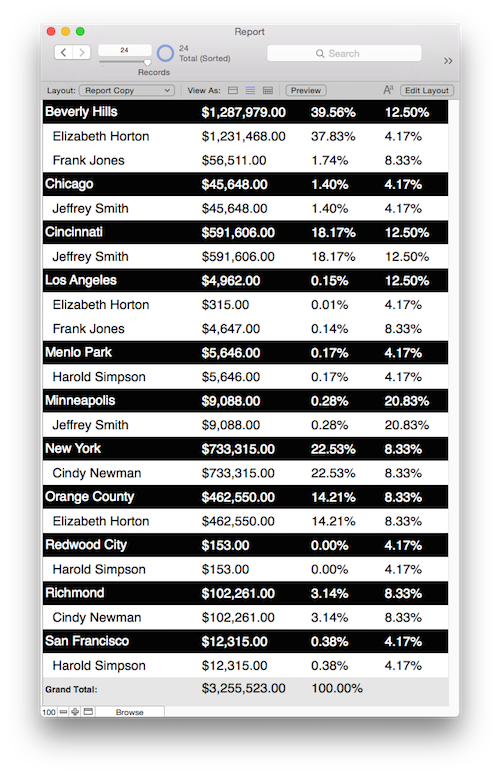
The Total Sales summary field was duplicated at the layout level and placed into the subsummary by city part to get totals by city. However, the GetSummary calculation needed to be duplicated and modified at the schema level to adjust the results for the city subsummary.
GetSummary(Count Sales; City) / Count Sales
Automation
Automating the display of a report is essential for ease-of-use. Think about your users trying to remember the layout, the find and the sort. They'll be calling you once a month or how often they run the report. "What layout am I supposed to use?" "What are those sorts fields again?" "How do you create a data range find?" Better to automate the report with a script, especially when you consider all the options you can include such as error checking, PDF creation and proper print setup.
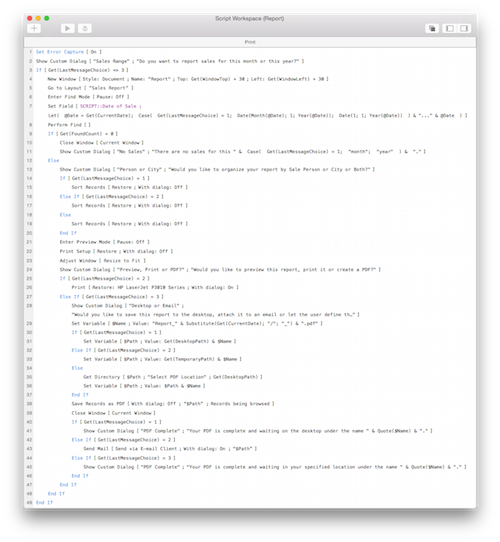
Here's the whole shebang so we can walk through each line. I suggest opening two browser windows so you can view the script and the walkthrough below.- Set Error Capture is essential in a print script in case no records or found or the print setup dialog is canceled.
- I almost always start off print scripts with a custom dialog, if only to allow them to cancel an errantly clicked button.
- Only run the steps in this If construct if the user chooses button 1 or 2.
- I almost always create a new window when generating a report. I offset it by 30 pixels or it will be right on top of the window below. I also recommend naming the window in case the user decides to open a lot of windows and cycle through them using the Window menu.
- I like to choose the correct layout early on so the context can be set correctly.
- I prefer Enter Find Mode with Set Field over Perform Find and a variable. Just seems more readable to me.
- The formula in the Set Field defines the find criteria with a date range for the current month or the current year.
- Perform Find initiates the find using the criteria defined in the previous step.
- If the found count is zero records then close the window and show a dialog explaining what happened. The FileMaker error dialog is suppressed by Set Error Capture. No need to show all records since a new window was opened.
- Close the current window since no records were found in the previous steps.
- A custom dialog informs the user what happened. Feedback is often forgotten by developers.
- Else determines what steps will run when record(s) are found
- If record(s) are found then show a custom dialog asking the user how they want the report organized.
- Test for message choice 1 or Person.
- If "person" is the message choice then sort by the sales person field.
- Test for message choice 2 or City.
- If "city" is the message choice then sort by the city field.
- Else determines if the message choice is 3 or Both.
- If "both" is the message choice then sort by both the city and sale person fields.
- End the If construct.
- Enter preview mode to view the report as it would print. Browse is also acceptable but make sure the layout is set to view a "list"
- Restore the print setup so the report displays as intended instead of using the last setup employed by the user.
- Adjusting the window in preview mode frames the window to the dimensions of a single page.
- Show a dialog asking the user if they want to preview the report, print it or create a PDF. The window underneath will be displaying the first page of the report as it will print.
- The If statement determines if the "print" button was selected. No need to test for the "preview" button since the report is already displaying.
- Print the records being browsed if the "print" button was selected in the previous steps.
- If "PDF" button is selected then perform the following steps.
- Show a dialog asking the user if they want to save the PDF to the desktop, attach it to an email or allow the user to define the location.
- Set a variable with the name of the file using the current date. Forward slashes are replaced with underscores for better operating system compatibility.
- Determines if the button choice is "desktop".
- If the button choice is "desktop" then point the $Path variable to the desktop.
- Determines if the button choice is "print".
- If the button choice is "email" then point the $Path variable to the temporary folder. The temporary folder is hidden from the user and deleted whenever FileMaker is quit so their hard drive is not cluttered with PDF documents.
- Determines if the button choice is "user".
- If the button choice is "user" then allow the user to select a directory or folder using the Get Directory step.
- If the button choice is "email" then set the $Path variable to the user defined location from the previous step.
- End the If construct.
- Save the report to the specified location in $Path using the Save Records as PDF script step.
- Close the window that was opened previously so messages can be shown on top of the original window.
- The If step determines if the button choice back in step 28 was "desktop". Unlike Get(LastError), Get(LastMessageChoice) is held in memory till another Show Custom Dialog step is run or the script ends.
- Show a message that the PDF is on the desktop. Provide the name so the file is easy to find.
- The Else If step determines if the button choice back in step 28 was "email".
- Create an email in Mac Mail or Outlook using the $Path variable to attach the PDF document.
- The Else If step determines if the button choice back in step 28 was "user".
- Show a message that the PDF is in the user defined location. Provide the name so the file is easy to find.
- End the If construct for the notifications of the PDF locations.
- End the If construct for the PDF creation.
- End the If construct determining if records were found or not.
- End the initial If construct determining if the user wanted to create a report or not.
Much more!
There's so much more you can do with reporting. This article just scratches the surface but it's a good start to proper data summarizing.
Author:
John Mark Osborne
jmo@filemakerpros.com
www.databasepros.com
Example File (available to patrons at $5.00 per month): Download here if you are a patron
This blog is completely free. Please support it by clicking on one of the advertisers at the left side of the window or becoming a patron. Thanks so much!
|
|
Comments:
|
|
|
Carlos Diaz
|
04/04/2021
|
|
|
Thank you for your clear and comprehensive article about summaries in FileMaker.
I'm was looking for some answer to my needs and after reading I could solve almost all of them. I still need to calculate the monthly increase in sales: I have a subsummary sorted by month where I get the total sales of each month. I need to include the % increase (or decrease) in sales compared to the previous month.
Any suggestions?
Thanks for your help!
|
Response by: John Mark Osborne
|
04/06/2021
|
|
For this endeavor, you are going to need some way to have the current records for the current month look at the record from the previous month. There are many ways to do this including scripts or relationships and calculations.
|
|
|
|
Marco Brandao
|
09/02/2019
|
|
|
Finally, an explanation that explain the Reports witchcraft thing.
FileMaker internal tutorial don't explain a thing about Reports. That is why so many, including me, struggle with that.
They spend link 2% of the tutorial to explain it, like if it is not important or that everybody is a Report wizard.
Even The Missing Manual series doesn't do a great jobs explaining it.
Kudo to you, Mr. Osborne — Grand Maestro of Filemaker.
|
Response by: John Mark Osborne
|
09/03/2019
|
|
You are most welcome Marco. Happy FileMaking!
|
|
|
|
Luigi Corte
|
07/11/2018
|
|
|
Very interesting! Is it possible to have subtotals at the botton of each page? Not running total, just the sum of every single page when they are printed.
|
Response by: John Mark Osborne
|
07/11/2018
|
|
Yes it is possible to get totals at the bottom of the page but it gets quite complicated. FileMaker is better at totaling by group. If you are interested, search at my databasepros dot com web site in the Resources area for "Totals by Page".
|
|
|
|
Steve M
|
07/25/2017
|
|
|
Excellent as always. Probably the best instruction I've ever read for beginner-intermediate reporting.
Thanks Jaymo!
|
Response by: John Mark Osborne
|
07/25/2017
|
|
Wow! Thanks so much. Huge compliment. I really appreciate it.
|
|
|
|
|