|
|
|
|
Alternatives to Serial Numbers
|
Level: Advanced
Version: FileMaker 16
Category: Scripting
Tuesday, March 13, 2018 |
|
|
|
|
|
|
|
|
|
|
|
|
|
|
|
|
|
|
|
|
|
|
In this final article from a series of four articles, I want to cover alternatives to restoring records using serial numbers and relationships. The first method I will cover uses the Snapshot Link feature and is fairly straightforward. Just a few issues with interface to overcome. The second is a script to save and restore find criteria. Restoring find criteria is no walk in the park. Strap on your galoshes cause we'll be wading through muddy waters. There are also various advantages and disadvantages of each technique that you'll want to pay close attention to so you can choose the right approach for the right situation.

Before starting this article, it is recommended you read the first three articles in the series as important foundational information may not be repeated:
1) Preserving Found Sets
2) Saving a Found Set
3) Collecting Unique Values
Snapshot Link
Snapshot Links were introduced to allow colleagues and clients to easily share reports, found sets, records, etc. The .fmpsl file that is created stores the found set, current record, sort order, layout, toolbar visibility and mode in a double-clickable document that will restore the saved settings in FileMaker Pro. Just email the .fmpsl file to your colleague or client and they can quickly see what you are seeing. It's a lot more efficient than describing to them how to perform the find, etc. As long as the person receiving the Snapshot Link has access to the specified FileMaker solution and the proper credentials, the file will open and the settings will be restored.

SIDE TIP: Credentials aren't stored with a Snapshot Link so there is no concern with security.
Since there is a script step that automates the saving of a Snapshot Link, it's fairly easy to store a .fmpsl file in a container field in a FileMaker table and then open it when needed. Start by throwing up a Show Custom Dialog step asking the user for a name for their found set and store it in a global field. No error checking is performed for duplicate names, as this was covered in a previous article in this series called Saving a Found Set.
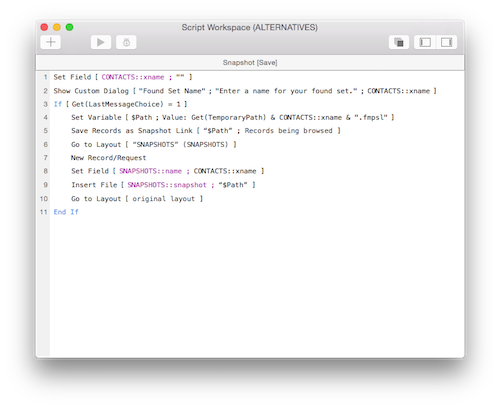
If you've ever generated a PDF in FileMaker and saved it to a location on your hard drive from a value stored in a variable then this isn't much different. Start by declaring a variable for the path using the Get(TemporaryPath) function with a name and the .fmpsl extension. The temporary path is used since it is hidden from the user and deletes each time FileMaker is exited.
Set Variable [$Path; Value: Get(TemporaryPath) & CONTACTS::xname & ".fmpsl"]
Then, just save the Snapshot Link to the variable location with the Save Records as Snapshot Link step.
Save Records as Snapshot Link ["$Path"; Records being browsed]
All that's left is to grab the Snapshot Link and place it in a container field. Navigate to the table storing the found sets, create a record and insert the Snapshot Link into a container field.
Insert File [SNAPSHOTS::snapshot; "$Path"]
Pretty easy, huh? The flip side of this technique is restoring the found set at a later time using the stored Snapshot Link.
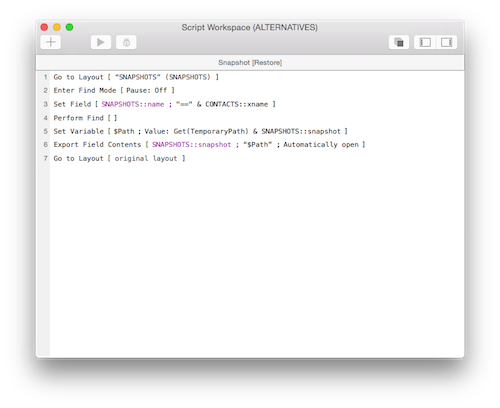
The part you don't see in the script is the selection of the found set name from a popup menu. Once a found set is chosen, the script goes to a layout based on the SNAPSHOTS table and performs a find to locate it. It's very important to include == in front of the find criteria so an exact match is performed. Otherwise, you might search for "John" and find both "John" and "Johnny".
SIDE TIP: FileMaker searches text fields starting from the beginning of each word. Partial matches on a word are acceptable matches. The same is not true for number, time, date and timestamp fields which requires a match on the entire value.
Once you've found the Snapshot Link record, set a variable to the temporary path and the file name, very similarly to the save script covered earlier. The difference is the extension .fmpsl doesn't need to be concatenated because it's already stored in the container field.
Set Variable [$Path; Value: Get(TemporaryPath) & SNAPSHOTS::snapshot
If the container field is stored as a reference or externally, you will need to employ the GetContainerAttribute function with the filename attribute (introduced in FileMaker 13). Otherwise, you will get the path name along with the file name and your operating system probably won't accept it as a file name.
GetContainerAttribute(SNAPSHOTS::snapshot; "filename")
SIDE TIP: The name of the exported file doesn't really matter since it is never seen by the user and is only used once. I chose to use the name it was saved with but ultimately it could be called the same thing on every export.
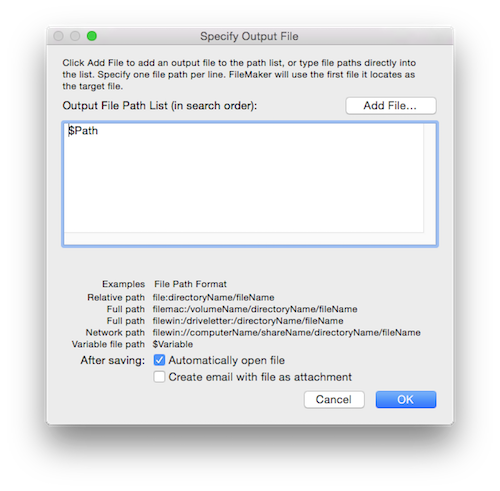
Finally, use the Export Field Contents script step to export the Snapshot Link to the variable location. You can open a file on the hard drive using the Open URL script step but, in this case, all you need to do is check the option to automatically open. No need to make the technique anymore complicated that it has to be.
OK, I give in. If you really want to open a file with Open URL, just precede the file path and name with "file:/". It could come in handy in a different solution. For example:
Open URL[With dialog: Off; "file:/" &
Get(TemporaryPath) &
GetContainerAttribute(CONTACTS::xname; "filename")
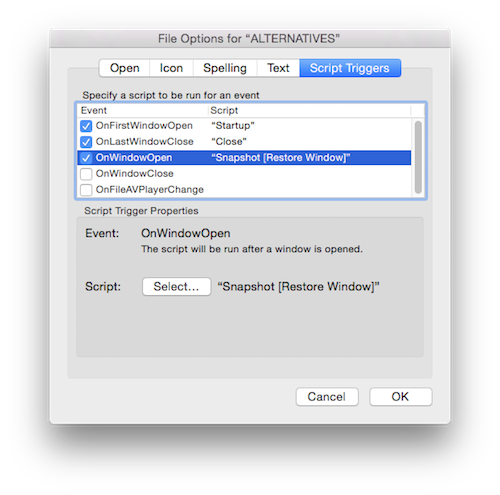
As I said at the opening of this article, the Snapshot Link technique is pretty straightforward but there are a couple of interface issues. First, the Snapshot Link will open a new window in FileMaker and restore the found set and other settings. That's fine but what I don't like is the default window dimensions. The default window size is determined by the last closed window. In most cases, this will be fine but sometimes the window size is less than optimal. In order to get the new window sized properly, a second script has to be written. That's right, it can't be added onto the script that exports and opens the Snapshot Link because it would act on the window where the script was initiated. This second script is set to run on OnWindowOpen from File Options (not OnFirstWindowOpen).
Adjust Window [Resize to Fit]
There is a second interface issue to consider, introduced by the window adjustment. If the layout preserved in the Snapshot Link is set to List View, the Adjust Window step with the Resize to Fit option will expand the vertical dimensions to fit the monitor. I prefer to keep my windows a consistent size throughout my solution so a couple more steps solve the problem.

The OnWindowOpen script trigger runs on every window that is opened but this should not be an issue. At least it's not an issue for the solutions I design since I rarely use this script trigger.
Saving Find Criteria
Preserving find criteria is no small feat. It requires complicated calculations, a looping script and in-depth developer knowledge about how FileMaker works. This is going to be the meat of this article for more advanced developers. However, I should be able to explain it well enough so that anyone who has read the first three articles in the series will understand.

The basic idea behind saving find criteria is to loop through all the fields on the layout where the search was performed and then place them into a table for when they need to be restored. This is the easy portion of the script, requiring only a basic field loop with Set Field concatenation.
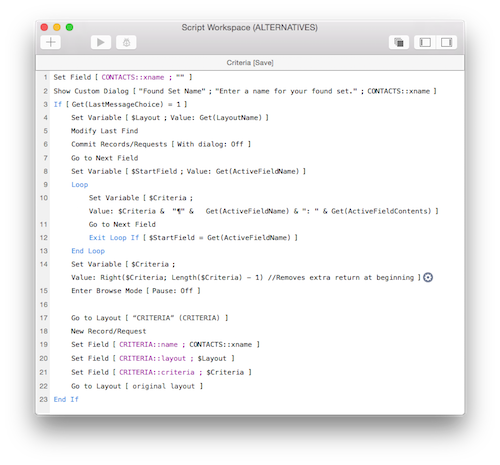
The first part of this script is exactly the same as the Snapshot Link script, simply asking the user to name the found set. Next, the layout name is preserved in a variable so it can be saved towards the end of the script, along with the find criteria. Modify Last Find is used next to reinstate the find criteria in find mode so it can be looped through and gathered into a return-separated list. I like to commit the records for no other reason than to start the loop at the same place each time. It really makes no difference in how the script runs since it doesn't matter on which field the loop starts. What 'm trying to achieve is a standard order of concatenation for ease of identification. If I don't commit the records, the field selected in browse mode will be the field selected in find mode and I'll start looping ona different field each time. Finally, I use Go to Next Field rather than specifying a field with Go to Field so it is a bit more adaptive to layout changes.
The loop is preceded with the storing of the first field name in a variable. There's no option to exit after last field like there is with Go to Record and the exit after last option. Therefore, you need to make your own exiting feature. Inside the loop, a simple concatenation the field name and the field contents is performed to construct a return-separated list of all the fields on the layout. Empty fields aren't really needed in order to restore find criteria but I like to see a standard listing of fields each time. Just personal preference so feel free to insert an If statement to skip empty fields. The loop is exited once the script gets back to the starting field by comparing the variable with the start field to the active field name.
LOGIC: Why choose to store the find criteria in a return-separated list? The answer is simple. A developer has complete control over the composition of the contents of a field, allowing for adaptive scripting that adjusts to the fields on the current layout. All other methods would require the definition of distinct objects to hold each piece of find criteria, leading to a solution that is static and inflexible.
Once the loop exits, the script is much the same as the Snapshot Link version. The only difference are the the fields that are defined as text instead of container. This is also where the layout name is stored. This enables the script to work with multiple tables, allowing the script to return to the layout where the find was originally performed. If the layout name is changed, this script will fail. If you're concerned about this possibility, store the source table name so that a generic layout based on the table can be used for restoration. This sounds a lot easier than it actually is. I do it in client solutions using strict layout and table occurrence naming conventions. If you are interested in this approach, take a look at the article titled Ultimate Find, also found on this blog. Otherwise, stick with the more straightforward layout storage.
SIDE TIP: Both Get(LayoutName) and Get(LayoutNumber) functions are subject to changes. A stored layout name can change but so can a layout number. If you rearrange a layout on the layout menu, the number will change, unlike a layout ID. Unfortunately, there is no way to store a layout ID and then restore it as a layout. Maybe there should be?
Now for the more complex portion of this technique, restoring the find criteria. This requires some logic to pull apart the return-separated list and place the values into the correct fields. The beginning of the script is pretty easy, just locating the found set the user wants to restore. It's really no different than the Snapshot Link script in this regard. Once the found set is located, the layout and find criteria are stored in variables. The script navigates to the layout stored in the variable and the magic begins.
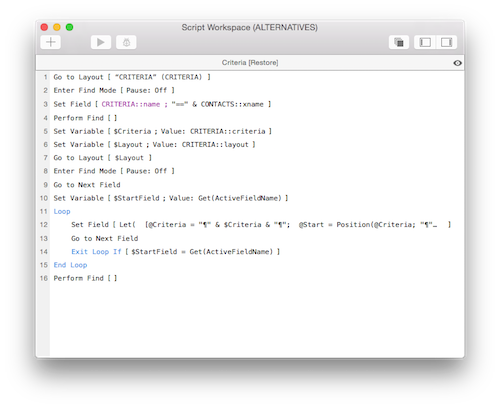
The loop is pretty basic and no different than what was already programmed for the saving of the find criteria. Where it diverges is seen in the Set Field step. Before looking at the formula, notice that the Set Field has no target field specified. This allows the result of the Set Field to go to the active field or where the cursor is blinking. This makes the script adaptive without using the ugly step-child of Set Field... Insert Calculated Result. The calculation in the Set Field is where the parsing sleight of hand occurs.
Let(
[@Criteria = "¶" & $Criteria & "¶";
@Start = Position(@Criteria; "¶" & Get(ActiveFieldName) & ": "; 1; 1) + Length(Get(ActiveFieldName)) + 3;
@End = Position(@Criteria; "¶"; @Start; 1)];
Middle(@Criteria; @Start; @End - @Start)
)
The formula is divided into three parts using the Let function. This makes it easier to program and explain. Starting with @Criteria, the criteria from the variable is surrounded by returns. The reason for the additional returns is uniqueness. I want to store the criteria in standard return-separated format but when searching for a value, it's important to find only what is being searched. For example, let's say you are looking for the "City" field but the criteria "Felicity" is stored in the "First Name" field. Search for "city" will locate "city" in "Felcity" unless you make the search more unique. More on how that search is performed will be discussed below.
SIDE TIP: I use at signs (@) to make my variable names stand out in the middle of complex formulas. However, they also offer the advantage of allowing me to name my variables anything I desire. For example, naming a variable LeftWords overrides the standards LeftWords functionality. Simply adding a preceding at sign allows for the declaration without disturbing standard FileMaker functionality.
The second declaration is the starting position of the value trying to be located. Word functions like Left, Right and Middle require a position within a text string to process their results. In this case, we will be using the Middle function so a number of characters will also be needed but more on this later. The @Start Let variable uses the Position function to locate the active field in the loop. The active field is preceded by a carriage return and followed by a colon and space to avoid the "Felicity" scenario outlined above. Since all lines in the return-separated list are now preceded with a carriage return, the Position function makes no mistake in locating the correct field. The length of the active field name and three more positions are added on to the result of the Position function in order to account for the field name and other text preceding the field contents. That's because the Position function returns the beginning of the text it locates and not the end.
The @End declaration in the Let function determines how far the Middle function needs to go to grab the find criteria. Let's be very clear! The Middle function function doesn't want the beginning and ending position of the text to extract. Instead, it wants the beginning of the text and how many characters from that position to grab. Luckily, a little grade school math comes in handy. Just subtract the starting point from the ending point and you end up with length.
If you have any trouble with this formula, it's a good idea to copy and paste the formula into the Data Viewer and substitute the $Criteria script variable with a global field containing sample data. Otherwise, you'll end up running the script over and over again just to see the results. Believe me, I've wasted many an hour testing scripts when I should have deconstructed and troubleshot with the Data Viewer.
Advantages and Disadvantages
So, what's the big differences between these methods. Well, if you built both solutions, it's pretty obvious that the Snapshot Link technique is far easier to implement. It's also important to note the Snapshot Link feature stores the layout ID which is not subject to change, making it far more foolproof. However, the Find Criteria technique has one major advantage in that it remembers the find criteria. That means the found set may grow if new records are added that meet the criteria. This could also be a disadvantage, depending on the result you are trying to achieve. BTW, the serial number approach, covered in the first three articles in this series, also stores a snapshot of the found set rather than the criteria that created the found set.
Author:
John Mark Osborne
jmo@filemakerpros.com
www.databasepros.com
Example File (available to patrons at $5.00 per month): Download here if you are a patron
This blog is completely free. Please support it by clicking on one of the advertisers at the left side of the window or becoming a patron. Thanks so much!
|
|
Comments:
|
|
|
Bruce Barrett
|
06/06/2019
|
|
|
Thanks for the RequestOmitState pointer... off I go to do some implementation!
|
|
|
Bruce Barrett
|
06/06/2019
|
|
|
Very nice article. first I came across on "find criteria restoration." Very, very useful!
A few thoughts, suggestions and question...
1. Using ":" and . It seems like this is "fragile." Don't search strings that contain ":" mess up the parsing when you go to replay the find?
2. You may be able to use JSON to define the field name (key) and contents (value) to avoid #1.
3. This works for standard "find these records,' as defined with 1 find record. (Find California sales > $500) but not more complex finds requiring multiple records (name = jones or smith, and not canada)
Putting another loop around the extraction with next/record, to get all the find criteria would help. Again JSON could help structuring the data collected.
4. Which brings us the the question: Have you thought of how to tell the the difference between a user's find records for include vs. omit ?
Even if this technique is limited to 1 include record it's cleaver and very useful!
Thank you.
|
Response by: John Mark Osborne
|
06/06/2019
|
|
Thanks for your kind words. Glad you likd it! 1 & 2) Searching on a colon or return will break the Saving Find Criteria technique. Since colons and returns are word separators and not indexed by FileMaker, it's an unlikely search criteria for someone to enter. I prefer to go with the 80/20 rules in these situations rather than complicating a straightforward solution. 3) The Saving Find Criteria was not meant to solve every scenario but shown as a starting point for your own (possibly) more complicated version you would program into your own solution (e.g. multiple find requests). 4) If you want to include the Matching Records option that is selected on a request, you can use the Get(RequestOmitState) function.
|
|
|
|
Peter Morlock
|
03/14/2018
|
|
|
very good article - I am sure parts of it will be integrated in my upcoming solutions
|
|
|
|