"No Holding Back FileMaker Blogging"


|
Navigation:
|
Support this site by clicking on a sponsor below or becoming a patron!

Create a Password Management solution!

Become a patron of this FREE web site!
|
|
Recent Blogs:
|
Currency Formatting
 |
Gathering Portals
 |
Multiple Choice Picker
 |
Popups and Pickers
 |
Window Locking
 |
|
Meta-Consulting
Meta-consulting is a service Database Pros offers to help other developers
over programming hurdles via GoToMeeting. Email John Mark Osborne or call John Mark at (909) 393-4664 to find out more about this service.
|

FileMaker 20 Video Tutorials
|
Quick Tip:
|
Search for Empty
Searching for records with an empty field works most of the time using a single equal sign (=). It can fail if a user has fat fingered a field by entering a space, a return or some other invisible character. While the field contains valid characters, the field is technically empty. In order to avoid this problem, search with two equal signs (==). |
|
|

FileMaker 20 Video Tutorials
|
Fun Stuff:
|
FileMaker Developer Worthiness
Top 10 ways you know your developer is NOT worthy:
- Spells "FileMaker" with a lowercase "m"
- Uses inches or centimeters instead of points in Inspector
- Recommends WebDirect deployment over FileMaker Pro
- Creates a solution with one file for every table
- Doesn't know Claris and FileMaker, Inc. are the same company
- Isn't certified for latest version of FileMaker
- Isn't an FBA member
- Charges less than $100.00 per hour
- Uses a rainbow of colors on his interface
- Provides a quote without a requirements document
|
|
|

FileMaker 20 Video Tutorials
|
RSS Feed
|
|
|
|
Stuff Ya Oughta Know
|
Level: Intermediate
Version: FileMaker 16
Category: General
Wednesday, March 28, 2018 |
|
|
|
|
|
|
|
|
|
|
|
|
|
|
|
|
|
|
Some things in FileMaker require an entire article to explain thoroughly. Others are just a paragraph of description but are no less important to your FileMaker professional career. Some people call them tips but I like to think of them as nuggets of truth. The stuff in this article was hand picked by myself based on the criteria of how important they were to me when designing a successful solution in FileMaker. I've probably forgotten to mention so many cool tips I use on a daily basis but this is what came to me when writing this article. Feel free to throw out your own personal ideas in the comments below. I'd love to hear about your nuggets of truth!

Pixels vs Points
In most cases, pixels and points are equal measurements. Pixels are a single dot on an image while points are a unit of length. They equal each other on 72 dpi Macintosh monitors, making it very easy to convert pixels to points. It's only when you start measuring at greater than 1/72 of an inch do the pixels and points diverge. This differentiation occurs on modern day Retina monitors which can cram in twice as many pixels into a point. Since FileMaker, Inc. is a wholly owned subsidiary of Apple, Inc., pixels were introduced in FileMaker 12 to support iPhones, iPads and desktop computers with Retina displays.

SIDE TIP: Android devices measure in DIPs or dp. It's the same concept as points, acting as a universal measurement that can be converted to pixels.
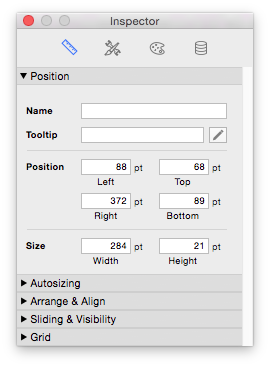
SIDE TIP: Click on the measurement type to the right of the input boxes in the Inspector to cycle through inches, centimeters and points.
Global Behavior
Global fields may not be as important as they were in the old days of FileMaker 6. It's true that FileMaker 8 variables replaced most of the uses for global fields, but they are still useful for filtered relationships or custom dialog entry. Therefore, it's important to know how they behave in all scenarios. In a single-user scenario, global fields contain the same value across all records. Whether the record is new or edited, the value placed in it is essentially copied to all other records. When a FileMaker solution is closed and opened again, the value in a global field is retained. When switching to a multi-user scenario, global values are cleared on the closing of a solution. Well, that's not completely accurate. Instead, global values are set to the default. The default is determined by the value contained in the global field before it was uploaded to FileMaker Server. It's also important to note that global fields do not cause record locking, making them an excellent interface tool.

SIDE TIP: Since global fields set to the default on closing of a file in a multi-user scenario, I usually initialize them in an OnFirstWindowOpen triggered script. This is better than trying to set globals to the default value you want before uploading them to FileMaker Server. However, if a global field is on a layout, used in a custom dialog or in a popover, they can usually be initialized by the script interacting with the named features.
SIDE TIP: Global fields don't require any relationship to reference their contents across tables. A common developer practice is to create a table especially for global fields so they don't clutter up the rest of your tables.
Visible Layout Boundary
In FileMaker 12, FileMaker, Inc. introduced a line demarcating the horizontal portion of layout mode visible in browse mode. Previously, it was defined by the object farthest to the right. With this innovation, new abilities beyond the obvious are at our finger tips. A common practice is to place a text object containing notes about the layout in the non-viewable area but what if you place a field? Certainly, the field won't be visible in browse mode but certain features can still access it. Any script that requires the field to be on the current layout will still function properly including Cut, Copy, Paste and any step beginning with "Insert". This is really helpful when you need to access a field from a script but don't want the user to see it. Any object can be accessed in the non-viewable area by a script including portals, web viewers, tab controls and more. This could be very useful or cause a script to stop functioning properly. For example, let's say you use the Quick Find feature. It will locate records containing values from the search whether the field is viewable or not, which could lead to confusion.
SIDE TIP: Prior to FileMaker 12, developers used to hide a field on a layout that they didn't want users to see but they needed to access with a script. This usually entailed reducing the font size to 1 point, resizing the field to 1 by 1 points and locking it. Unfortunately, with no way to easily see the field or annotate it, it was often overlooked or even deleted.
Single Step vs Script
We all know script steps sometimes work differently on different platforms (e.g. FileMaker Pro versus WebDirect), but they should work identically within the same platform, right? What I've found is attaching a Go to Field as a single step directly to a button and creating a single line script behave differently in some situations. The time I encounter this the most is when making a script to popup a drop-down list. All it needs is one line so naturally I attach the single Go to Field step to the button without making a script. Works great as long as I don't prevent access to the field in browse mode via the Inspector. Funny thing is, it works just fine when the same exact script step is attached to the button but contained with a script. It's worked like this for years and threw me for a loop the first time I encountered it. I guess it's just one of those idiosyncrasies you learn to workaround.
SIDE TIP: The same issue occurs with Go to Object, Go to Next Field, Go to Previous Field, Copy, Cut, Paste, any step beginning with Insert and any step that has to select the field before performing.
Looping
Most developers have created a record looping script sometime in their career. There's a couple of basics for which you need to be mindful. For example, it's always a good idea to go to the first record of your found set before beginning your loop or you may not loop through all your records. It's also a good idea to Freeze Window, especially on long loops, so record redraw doesn't slow down your loop too much. And, of course, it's crucial to turn on the "Exit after last" option on the Go to Record/Request/Page inside the loop or the script will perform the same action on the last record over and over and over.
What a lot of people don't know is there are a variety of different loop types:
Record
Field
Portal
Data
Script
Record Loops walk through records in the found set so Field Loops walk through fields in the tab order on the current layout. Portal Loops cycle through the rows in a portal on the current layout but make sure to specify the portal with the Go to Object step or FileMaker will choose the portal farthest back in the layering. You can change the layering with the items under the Arrange menu but it's just best to use Go to Object in case that layering changes in the future and you forget the script requires a specific layering order.
A Data Loop runs through data in a single field on a single record. The data is usually arranged in a prescribed manner such as return or comma-separated. In a non-data approach, a Script Loop repeats the same script steps over and over. This one is a little harder to understand and really needs an example so refer to Ultimate Find article for more information.
Once you start employing all these different loop types, it's important to know how to exit them. I've memorized a list of the script steps that can exit a loop so I can call on it whenever needed. Most of the time, it's pretty easy to figure out how to exit a loop. For example, a Record Loop almost always uses the "Exit after last" option on the Go to Record/Request/Page. I have exited a Record Loop using a different method but it's not very common. On the other hand, how do you exit a Field loop? There's no option on the Go to Next Field to exit after the last field. Sometimes it's not clear and it's handy to know every way to exit so you can whittle it down to the one or several possibilities. So, here is the list:
Go to Record/Request/Page [Next; Exit after last]
Go to Portal Row [Next; Exit after last]
Exit Loop If
Exit Script
Halt Script
Close Window (if it's the last window open for the file)
Close File
Exit Application
The most commonly used are the first three. However, I have used almost every single one at least once. When confronted with a loop that cannot be exited by standard methods, write down this list and check off the choices till you have one or a couple left. This will really help you pick the best solution.
SIDE TIP: Field Loops are commonly exited using the Exit Loop If step by setting the starting field name to a variable and checking to see if the loop has come back to the first field.
Get Functions
Get Functions were originally designed to be used in scripts but if you know a simple trick they can function properly in Manage Database calculations. What happens is they don't refresh. For example, let's say you include Get(FoundCount) in a calculation designed to recreate the status toolbar information. Since there are no field references in the calculation, there is nothing to trigger the calculation field to update. Even if there was a field included, the data in the field would need to be modified to update the formula. Even then, changing of the found set would not update the formula unless you make it unstored.

BTW: Hide Object, Conditional Formatting, Placeholder Text and other formulas assigned at the layout level are unstored by nature and will update whenever the screen refreshes.
Date Searches
Searching ranges of dates, numbers, times and timestamps are pretty easy. Just use the greater than, less than or ellipsis.
3/1/1967...3/31/1967
>3/1/1967
≤3/31/167
SIDE TIP: You can use two or three periods for an ellipsis
What's not so obvious are the myriad of other choices for searching in date fields. One of my favorites is the asterisk. With it, you can search for birthdays:
3/*/*
The search criteria above will find all dates in the month of March, regardless of day or year. The asterisk will also work with time and timestamp searches.
You can also search with curly brackets on date. time and timestamp fields:
3/{1...15}/1967
And last but not least, you can type in days of the week:
Mon...Fri
The above search locates all dates that occur on the week days, excluding all weekends.
Field Order
If you've ever wondered why fields show up in a strange order in the Specify Field dialog or Field Picker palette then this tip is for you. It's really simple. The order fields are sorted under the Field tab in Manage Database dictate the order they appear in dialogs displaying fields. If you're like me and use type ahead in the Specify Field dialog, having the fields sorted alphabetically is extremely important.
SIDE TIP: Don't forget to set your Manage Database field View By to "field name" before you upload your solution to FileMaker Server or you'll constantly be changing the View By order each time you open the solution. That's right! This is one of the many defaults stored from a file when it goes from single-user to multi-user.
Smart Duplicate
FileMaker 16 has so many great tools for aligning objects that one of the earliest features is often forgotten. Smart duplicate has been around since the beginning of FileMaker time. While it may not be as useful as when it was first introduced, taking a back seat to Dynamic Guides, Smart Duplicate still has it's place once in a while.
Normally, when duplicating an object, it is offset 8x8 points. If you move the newly duplicated object without deselecting it and then duplicate again, it will offset the amount you moved it. I often make rows of buttons using this method. It can make short work of a tedious job. Here are the steps:
- Click on an object
- Duplicate the object using the item under the Edit menu or keyboard command
- Without deselecting the object, move it with the mouse or arrow keys
- Duplicate
- Repeat step 4 as many times as desired
Select Similar
The new Layout Objects palette in FileMaker 16 is awesome for getting at objects that can't easily be clicked but there's one thing it can't do. It can't similar objects like all fields on a layout. This is pretty hand if you want to override the settings for all fields and don't want to modify the Styles for the current Theme. Here are the steps for fields, text blocks, lines, shapes, portals, tab controls or just about any object that is differentiated on the toolbar in Layout mode:
- Select on a single object by clicking on it
- Type Option-Command-A on Macintosh or Shift-Control-A on Windows
It's also possible to hold down the Option (Macintosh) or Shift (Windows) key while choosing Select All from the Edit menu. On the Macintosh, the menu item will change from Select All to Select Same. Windows will not change the menu item so you just have to trust it will work.
There's one more way to select the same object. If the tool allows for clicking and highlighting then select that tool and simply to a regular select all command. While you can perform the select same action with lines, shapes, portal, tab controls, etc., it can't be performed with fields because the tool is draggable not clickable.
Comparing Containers
Who would of thunk it? Yes, you can compare the contents of two container fields to see if they are equal. That's because FileMaker efficiently stores multiple container contents once no matter how many records or fields the contain the same value. But, how can you use this feature? Well, I can't say I use it a lot but I have used it in the past. It's one of those pieces of information you file in the back of your brain in the FileMaker compartment and pull it out once or twice in a career.
Smaller Merge Fields
I often prefer regular fields because they truncate the name of the field to the size of the field when displaying in layout mode. Merge fields require the text block to show the entire field name and table reference which can get quite lengthy on a layout that is cramped for space. But, sometimes you need their unique features. While making the text block bigger doesn't affect the display of the data, it can block access to other objects on the layout.
There's an easy solution to making merge fields fit in the area you want. Start by selecting the merge field from the second chevron to the second to last chevron. In other words, select everything but the beginning and ending character.

The next step is to change the font size smaller. I usually choose 6 point so I can still read the field reference.

If you are really cramped for space, choose a custom size of 1 point.

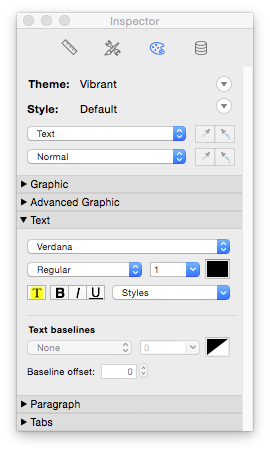
Custom sizes can be set in the Inspector under the Appearance tab or via the toolbar.

SIDE TIP: You don't actually need to leave the first and second chevron characters intact. All that is needed is one of them, either first or last. I just find it easier to identify where the merge field begins and ends when both are left at the original size.
Author:
John Mark Osborne
jmo@filemakerpros.com
www.databasepros.com
This blog is completely free. Please support it by clicking on one of the advertisers at the left side of the window or becoming a patron. Thanks so much!
|
|
Comments:
|
|
|
Rebecca Johnson
|
03/30/2018
|
|
|
John Mark is a wonderful teacher and these hints are much appreciated and helpful.
|
|
|
|