
"No Holding Back FileMaker Blogging"


|
Navigation:
|
Support this site by clicking on a sponsor below or becoming a patron!

Tips & Tricks Videos

Become a patron of this FREE web site!
|
|
Recent Blogs:
|
Currency Formatting
 |
Gathering Portals
 |
Multiple Choice Picker
 |
Popups and Pickers
 |
Window Locking
 |
|
Meta-Consulting
Meta-consulting is a service Database Pros offers to help other developers
over programming hurdles via GoToMeeting. Email John Mark Osborne or call John Mark at (909) 393-4664 to find out more about this service.
|

$10.00 Beginner Video Training
|
Quick Tip:
|
Semi-Sorted
A database can either be sorted, unsorted or semi-sorted. The first two are pretty obvious, but it is less clear how a database becomes semi-sorted. A database becomes semi-sorted when a new record is added to a currently sorted database and the option to keep records sorted is unchecked. It can also become semi-sorted if a record is edited -- but only if one of the fields used in the sort is edited. Deleting a record will not make a database semi-sorted. |
|
|

Create a FileMaker Calendar
|
Fun Stuff:
|
FileMaker Developer Worthiness
Top 10 ways you know your developer is NOT worthy:
- Spells "FileMaker" with a lowercase "m"
- Uses inches or centimeters instead of points in Inspector
- Recommends WebDirect deployment over FileMaker Pro
- Creates a solution with one file for every table
- Doesn't know Claris and FileMaker, Inc. are the same company
- Isn't certified for latest version of FileMaker
- Isn't an FBA member
- Charges less than $100.00 per hour
- Uses a rainbow of colors on his interface
- Provides a quote without a requirements document
|
|
|

Fireside FileMaker Podcast
|
RSS Feed
|
|
|
|
Phone Filter Part One
|
Level: Intermediate
Version: FileMaker 15
Category: Calculations
Tuesday, March 7, 2017 |
|
|
|
|
|
|
|
|
|
|
|
|
|
|
Phone formatting is one of my favorite techniques because it teaches so many important concepts. The interaction between a complex formula, auto-entry and validation is fascinating to me. There are so many possibilities, as well as potential hazards, when combining different components. When you get the hang of it, there is nothing like the feeling of weaving a new ability through the union of multiple features.

The goal behind this exercise is to make data entry consistent. If you let every user enter a different format for their phone numbers, the results will be pandaemonium. Imagine looking at phone list where phone numbers are formatted in half a dozen ways or more. The mind welcomes consistency, finding it easier to view. While you could train your users on how to enter phone numbers, it’s much easier to let the users be themselves and format the numbers for them.
The Data Viewer
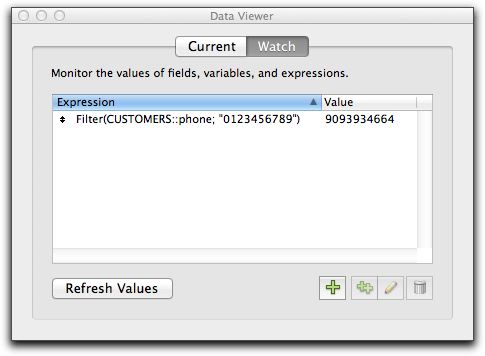
It’s a crucial you start using the Data Viewer to construct formulas whether they will be used in scripts, calculation fields, validation, auto-enter or wherever. Think of the Watch tab of the Data Viewer as a cocktail napkin where you prototype a formula. It’s so much easier than creating a field in Manage Database and than testing it. Each time you need to tweak it, you’ll need to enter Manage Database again. Not to mention placing it on the layout when it might not even go on a layout. The Data Viewer makes the creation process so much more efficient. No more running scripts to see if the formula worked. No more triggering out-enter formula to return a result.
Filtering
The first step in formatting a phone number is to filter out all the formatting like parenthesis, spaces, dashes, etc. In the old days, this was a difficult process of combining multiple functions. In the modern FileMaker, the Filter function takes care of everything in a single function. The Filter function simply needs to know which characters you wish to preserve and it will remove everything else. Be careful to always include your filter characters in quotes or a leading zero will be discarded as numbers do not begin with zeros.
Test the formula by changing records and see how it reacts to different phone numbers. While this formula is fairly simple, you get the idea that the Data Viewer is much easier to test formula results. Once the unwanted characters are removed, it’s time to add in the desired format. I am partial to parenthesis around the area code and a dash between the exchange and the subscriber numbers. However, format the phone number using any method you see fit.
Start by copying the existing Filter formula to the clipboard. Then, surround the existing formula with the Left function and pull out the first three characters or the area code. Sandwich the Left function between the formatting and the first line of code is done. Don't forget the space after the close parenthesis!
"(" & Left(Filter(CUSTOMERS::phone; "0123456789"); 3) & ") " &
The second line is pretty close to the first except the Middle function is utilized instead. The Middle function requires the starting character as counted from the beginning of the field as well as how many characters from that point to grab. Just paste the code from the clipboard into the first parameter of the Middle function and add the appropriate values to extract the three digit exchange.
Middle(Filter(CUSTOMERS::phone; "0123456789"); 4; 3) & " - " &
Concatenate the appropriate formatting and move on to the third line of code using the Right function. Right is the oddball of the bunch and likes to start from the right side of the field and grab the number of specified characters. Paste the code inside the Right function and specify a value of “4” for the second parameter to grab the subscriber number.
Right(Filter(CUSTOMERS::phone; "0123456789"); 4)
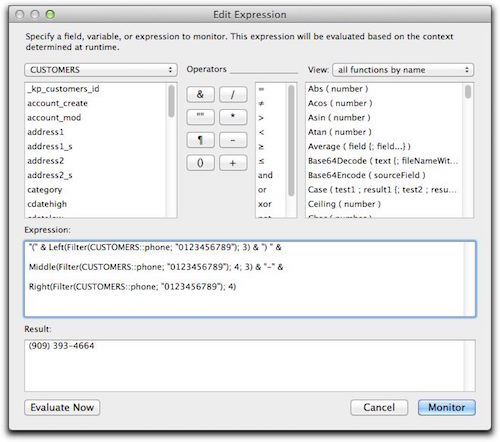
SIDE TIP: Nested calculation formulas evaluate from the inside out. The inside formula returns a result to the outside formula and then the outside formula returns the result to the Auto-Enter, Validation, Script or wherever the formula is being employed.
The Let Function
Notice that the same piece of code filtering the phone number was duplicated three times. Not only does it make the formula difficult to decipher, it also unnecessarily complicates the editing process. Here comes the Let function to the rescue, centralizing your code within a calculation. Here’s the same formula using the Let function to declare variables:
Let(
@Numbers = Filter(CUSTOMERS::phone; "0123456789");
"(" & Left(@Numbers; 3) & ") " &
Middle(@Numbers; 4; 3) & "-" &
Right(@Numbers; 4)
)
The formula is organized better with the repeated code declared at the beginning, making it easier to read, understand and edit. For example, if you want to use the formula on a different field with a different name, there is only one place to make the change instead of three. In addition, the declaration of a single piece of code makes the formula faster. Instead of calculating the formula three times, it is only calculated once. While this may not make a noticeable difference in this particular formula, imagine a scenario where it would. What if the formula is used in a calculated Replace Field Contents over thousands of records? What if the repeated formula references aggregates of related fields that slow down as more records are added to the solution?
Let variables do not require an at sign (@) at the beginning like a script variable requires a dollar sign ($). My naming convention helps identify the variable quickly amongst the rest of the formula due to the uniqueness of the at (@) character. Other developers use tildes (~) but I don’t find them as recognizable as the at (@) sign, making them harder to pinpoint in a formula. Some also use a dollar sign ($) but I find this confusing since script variables can be declared in a calculation formula.
Adding a unique character at the beginning of a variable name also enables the use of reserved words. For example, if you try to declare a variable named “Left”, this conflicts with the reserved Left function. FileMaker could throw up an error message but instead allows this declaration. The result is the Left function is now replaced with the variable declaration. Any Left function functions contained within the formula will now produce an error pointing to missing parenthesis or operators. Adding some character like an at sign at (@) the beginning avoids this issue altogether and allows for unlimited variable naming.
I’m going out on a limb and stating that the Let function should be included in almost every calculation written. Exceptions include short formulas with a single occurrence of each field reference or single level Case statements. Once a second occurrence of a field reference is needed or multiple tests in a Case statement are added, the benefits are too hard to ignore. A general rule might be if the formula grows to a second line, add a Let function. Even with a single field reference or a short conditional, having the field(s) declared at the beginning of the formula makes it so easy to adapt it to another database with different fields names.
Final Resting Spot
While the phone formatting formula is far from complete, it’s mostly complete and can be transferred to the auto-enter calculation section on the phone field. Since calculations defined in Manage Database have perspective controlled by the table where they are defined, there is no need for a table occurrence when referencing the phone field. This is the only downside of designing calculations in the Data Viewer that are destined for Manage Database. Scripts are different story since context is determined by the layout where the script is performing.
In fact, let’s take it one step further and remove the reference to the phone field entirely. The Self function was designed specifically for the Conditional Formatting feature but works perfectly in any Manage Database calculation formula, referring to the field to which it is attached. Now the phone formatting formula is completely adaptive, able to be copied and pasted to any field in any database. Click done to exit the Auto-Enter dialog.
With the option to “do not replace existing field value (if any)” checked, the auto-enter will only occur when the target field for the auto-enter is empty. It’s very important not to forget to uncheck the option to “do not replace existing field value (if any)” or the auto-enter will never format the phone number. Each time a field referenced in the calculation is modified, the auto-enter formula will reevaluate.
Variable Lengths
Problems start occurring with the phone formatting formula when more or less than ten digits are entered into the phone field. Some numbers will be duplicated and others lost since the Left, Middle and Right functions don't adapt. In order to handle typographical errors as well as phone numbers without area codes, a conditional statement is required:
Let(
@Numbers = Filter(Self; "0123456789");
Case(
Length(@Numbers) = 10;
"(" & Left(@Numbers; 3) & ") " &
Middle(@Numbers; 4; 3) & "-" &
Right(@Numbers; 4);
Length(@Numbers) = 7;
"(909) " &
Left(@Numbers; 3) & "-" &
Right(@Numbers; 4);
Self
)
)
The Case statement determines whether there are ten or seven digits entered and applies the appropriate formula. Otherwise, the default returns the same value as the user entered without removing the formatting. There are two reasons for this decision. First, leaving the original entry is an indicator to the user that there is something wrong. Second, if a blank result is allowed for the default, the phone number will be erased to the dismay of the user.
More declarations can be made now that the formula has been expanded. There are two pieces of repeated code but for sake of clarity, all three text functions will be declared. Notice the square brackets that are required when more than one variable is declared:
Let(
[
@Numbers = Filter(Self; "0123456789");
@Left = Left(@Numbers; 3);
@Middle = Middle(@Numbers; 4; 3);
@Right = Right(@Numbers; 4)
];
Case(
Length(@Numbers) = 10;
"(" & @Left & ") " &
@Middle & "-" &
@Right;
Length(@Numbers) = 7;
"(909) " &
@Left & "-" &
@Right;
Self
)
)
Is this going too far? Is there any downside to declaring too many variables? I think that question can only be answered by each developer himself. Some developers find having every bit of logic declared at the beginning of a formula is helpful. Others feel only meaningful or key pieces of code should be declared. Others are hybrids. In other words, everyone is different and should adopt their own rules of variable engagement. Don’t just blindly follow the path of another developer like a clone. Pick and choose what makes sense for your development style.
Validating Erroneous Entries
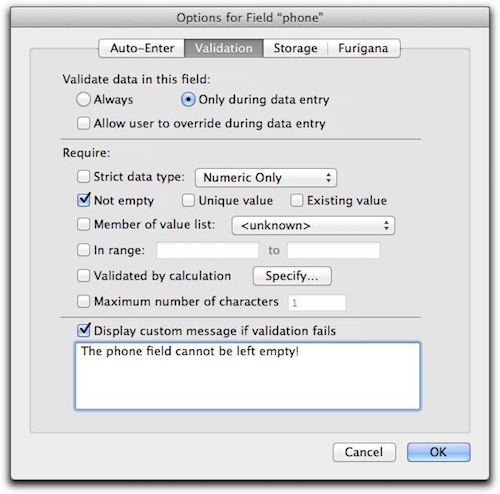
The default result in the Case statement also serves another purpose. Everything in FileMaker has an order of operations. In the case of field options, Auto-Enter occurs before Validation. If the auto-enter formula erases the phone number entered by the user, there is no way to validate it. With that said, the formula for the validation will look very familiar:
Let(
@Numbers = Filter(Self; "0123456789");
Length(@Numbers) = 10 or Length(@Numbers) = 7
)
Remember that validation requires a Boolean result which is provided by a simple comparison so there is no need for a conditional statement like Case. This is also a good time to update the custom validation message to include the new error possibility of 10 or 7 digit phone numbers.
Centralizing the Code
As mentioned previously, the formula can now be copied from table to table without alteration since it references no fields. But, what happens if you paste the formula in five different tables across a single solution and then find a mistake. Updating the errant formula will require you to make the changes five times. I don’t know about you but this bugs the heck out of me.
Centralizing the code can be achieved by creating a Custom Function. The Custom Function dialog looks exactly the same as the standard calculation dialog except the field list is replaced with a parameter list. You, as the developer, define parameters instead of fields for the custom function being designed. Fields or formula results are passed into the custom function just like any standard out-of-the-box function that comes with FileMaker. In other words, you are creating your own calculation function that can operate across your entire file. Custom functions will need to be imported to other files as needed.
Copy the existing auto-enter and validation calculations and paste them into new custom functions named “PhoneFormat” and “PhoneValidate”. Replace the Self function with references to the new parameter called “Phone”. Once the formula are complete, the new functions will appear in every calculation dialog under the Custom Functions area. As with any calculation functions, custom functions can also be typed by hand instead of navigating the interface with a mouse. There is no operational difference between FileMaker functions and custom functions.

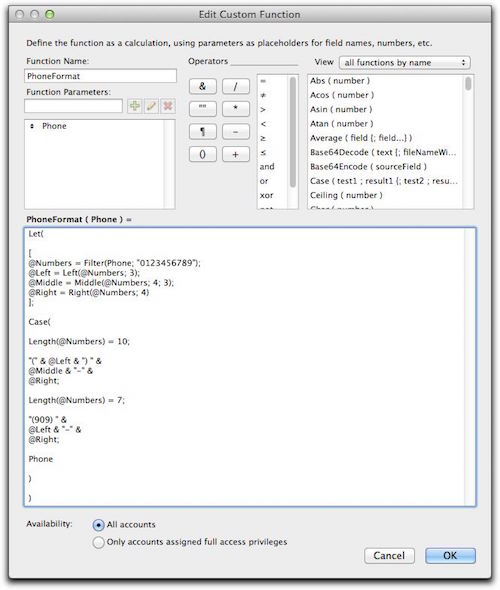
When referencing the PhoneFormat and PhoneValidate custom functions in the Auto-Enter and Validation calculation dialogs, refer to the phone field with the Self function so the formula can still be easily copied and pasted to the “phone2” field. Don’t forget to uncheck the option to “do not replace existing field value (if any)”.
PhoneFormat(Self)
and
PhoneValidate(Self)
Phone Filter (Part 2) now available!
Author:
John Mark Osborne
jmo@filemakerpros.com
www.databasepros.com
This blog is completely free. Please support it by clicking on one of the advertisers at the left side of the window or becoming a patron. Thanks so much!
|
|
Comments:
|
|
|
Turquise Bridge
|
07/06/2020
|
|
|
Thanks for your useful videos. I have a question that perhaps you can shed some light on it. I have formed a layout that has my expenses displayed which are in UK Pounds, I have gotten a Summary also that shows the annual expenses. I have entered the amount in the standard as Pound which is the same format as other expenses in Dollar, in the Layout I want to add a column that takes the Amounts in Pound and multiplies by the current exchange rate of lets say, 1.3 for pound to dollar. I can not figure out how to create the argument so that it shows the figures side by side in the layout in both Pounds and converted in Dollar. Many thanks
|
Response by: John Mark Osborne
|
07/07/2020
|
|
The calculation of the conversion should be done at the record level rather than the summary level. Create a calculation that converts from UK to US on each expense record and then use a summary field to total the calculation field.
|
|
|
|
John
|
06/15/2018
|
|
|
Lol all this to put in a phone number
No wonder Access is the way to go! Set phone mask 1 step and done!
I just keep finding out why Access completely out does FileMaker! This is certainly a prime example! To bad too cause there is a lot to like about FileMaker! I wish it wasn’t so
|
Response by: John Mark Osborne
|
06/22/2018
|
|
Access has added lots of features aimed at specific tasks while FileMaker has a taken a different approach and offers broad features. In this example, FileMaker doesn't offer a phone formatting feature but instead offers a calculation engine that can accomplish a wide variety of tasks, one of which is formatting a phone number. Once the formula is completed, you don't need to enter it again. Just copy and paste. I think when you consider FileMaker, you need to look at the bigger picture rather than the isolated view from your limited Access point of view.
|
|
|
|
|