|
|
|
|
Conditional Tab Control
|
Level: Intermediate
Version: FileMaker 19
Category: Scripting
Tuesday, August 11, 2020 |
|
|
|
|
|
|
|
|
|
|
|
|
|
|
|
|
|
|
|
|
|
|
The story to this solution begins with a client of mine who has complicated contact management needs. Each contact falls into a particular category and not all panes in the Tab Control object need to be shown for each contact. I started off by offering a conditional formula on a standard Tab Control object that resulted in "" or blank when the pane was not available for the current contact. This resulted in a small tab at the top of the Tab Control but didn’t make it disappear.

I also had to use the Hide Object feature, in the unavailable panes, to hide the objects in case a user clicked on the tiny tab that was meant to be hidden. This required a lot of objects with Hide Object formulas. Not only was it complicated to make changes but it also had an inferior interface and even started to show signs of of speed degradation. Somehow, by luck, I was talking to Michael Rocharde about the issue and he had the perfect solution. As he shared with me, I'm going to share with my readers.
My Philosophy: I'm old school and still believe the internet is about sharing for free. Sure, corporate America has a place on the internet but I think what makes the internet world go around is people sharing their expertise for free.
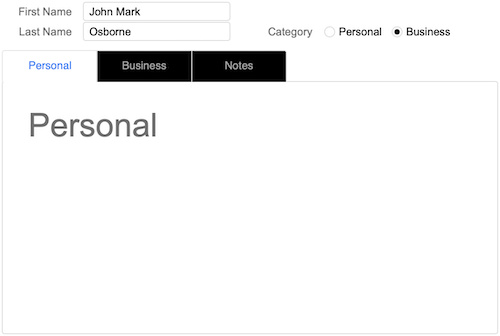
The solution I am presenting here is very simplified when compared to my client's solution. I do this on purpose to teach you the fundamentals so you can can tweak it to meet the needs of your unique situation. By combining a Slide Control, Hide Object and a Button Bar, I was able to mimick a Tab Control object but with the added functionality of hiding button segments cleanly. To connect the Button Bar segments to the Slide Control, all that is needed is to name each Slide Control pane via the Inspector and then use the Go To Object script step to select the correct pane. It's really that simple but I'll cover it in more detail below.
The Slide Control
The Slide Control object is essentially the same as the Tab Control object, which is why the two features occupy the same place on the toolbar. Just click and hold down on the Tab Control button and you can switch it to a Slide Control. The big difference between the two objects is how they are navigated. Tab Control objects have clickable tabs at the top while Slide Control Objects can be navigated using the navigation dots.
FYI: Slide Controls are essentially an iOS feature for the iPhone and iPad, supporting hand gestures. But, they also work great in desktop solutions if you allow for mouse control using a Button Bar and the Go to Object script step!
While the navigation dots suffice for navigation on a desktop solution, they're really too small for a good interface and don't indicate, by name, which pane is selected in the Slide Control. In other words, Slide Control objects are for touch devices but with a few additions they can work great on a desktop. Once you have your Slide Control object sized to the proper dimensions, I recommend removing the dots for a cleaner interface. But, it's up to you. They'll work fine with the button bar described below.


BTW: In the screen shots above, you can see how the navigation dots take up a significant amount of screen real estate. It's about 20 points/pixels give or take a few points/pixels. Multiply that by the width of your Slide Control and you have some significant loss of usable layout space.
Before removing the navigation dots, make sure to name each pane in the Slide Control using the Inspector. In the example file provided with this article, I have panes for information regarding "Personal", "Business" and "Notes". Therefore, I named each pane with the same exact names. Resist the temptation to use some esoteric naming convention. Keep it simple and you'll be happier down the line.

Once you have all your panes named via the Inspector, the navigation dots can be removed. This frees up a bunch of real estate but also makes it more difficult to navigate to different panes while in layout mode. What you have to do is select the pane in browse mode via the button bar described below and then enter layout mode. It's a bit inconvenient so it could be a good reason to keep the navigation dots. Your call. I just don't like them from an interface and screen real estate perspective.
The Button Bar
I've always hated (heartily disliked) the Button Bar object. I don't like having my buttons connected to each other. It seems like a great idea but for me it prevents me from creating the interfaces I desire. I want nicely spaced buttons, not all of them crammed into one continuous block. The only time I use Button Bars is when I need a calculated button name. Even then, I only use a single button in the Button Bar and almost always change the appearance from the supplied themes to match a regular button. I guess it just seemed like a hassle to me.
TIP: The themes included with FileMaker were designed by interface guru Heather Winkle so I see no need to design my own.
Now that I know the Hide Object feature works on each button independently, I've changed my viewpoint (somewhat). In other words, I can make buttons in a bar appear and disappear. No big deal, right? You can make any object appear and disappear. The difference is, the buttons in the Button Bar grow and shrink within the overall width of the Button Bar, making a very clean interface. Now, why can't they do the same thing on Tab Control objects? Must be two different guys programming these features.

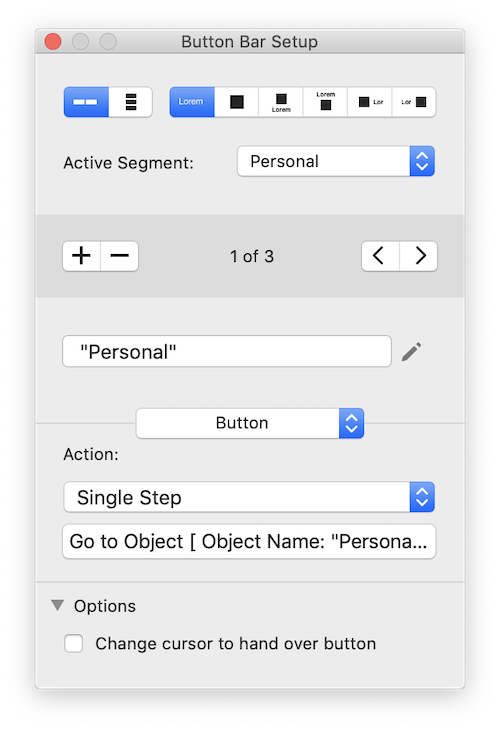
There's really only one step to connect the buttons to the Slide Controls using the Go to Object script step. You can get more complicated with script parameters to make a dynamic script but I don't really see the point. Just hard code each button as a single step to select each particular Slide Control pane.
Go to Object [Object Name: "Personal"]
Go to Object [Object Name: "Business"]
Go to Object [Object Name: "Notes"]
Hiding the Buttons
Hiding button segments is also pretty easy. Just select a button segment you want to hide and use the Inspector to add a Hide Object calculated condition. In the case of my simple example, I have a field called "category" which has value list choices of "Personal" or "Business" to categorize each contact record. With business contacts I have an additional tab called "Business" that I want to hide when it's a personal contact. It's a nice interface trick that does a couple of things. First, it hides options that aren't needed for the current contact type. Also, when the interface changes, it makes it clearer what type of contact you are viewing without looking at the category field.
The formula I'm using in my example file on the "Business" button segment is:
CONTACTS::category = "Personal"

Remember, the Hide Object feature hides the specified objected when the formula results in a true statement.
Interface Work
You don't need to but I did some interface work to make the Button Bar blend with the Slide Control so it looks more like a Tab Control. All this takes place in the Inspector in the Appearance section. Simply click on the Button Bar and change whatever options you want. Here's what I did. I started by clicking once on the Button Bar to specify the settings for the entire Button Bar. Specifically, I specified rounded corners on the top left and right. I also added a line to the outside border so the rounded corners would actually display.
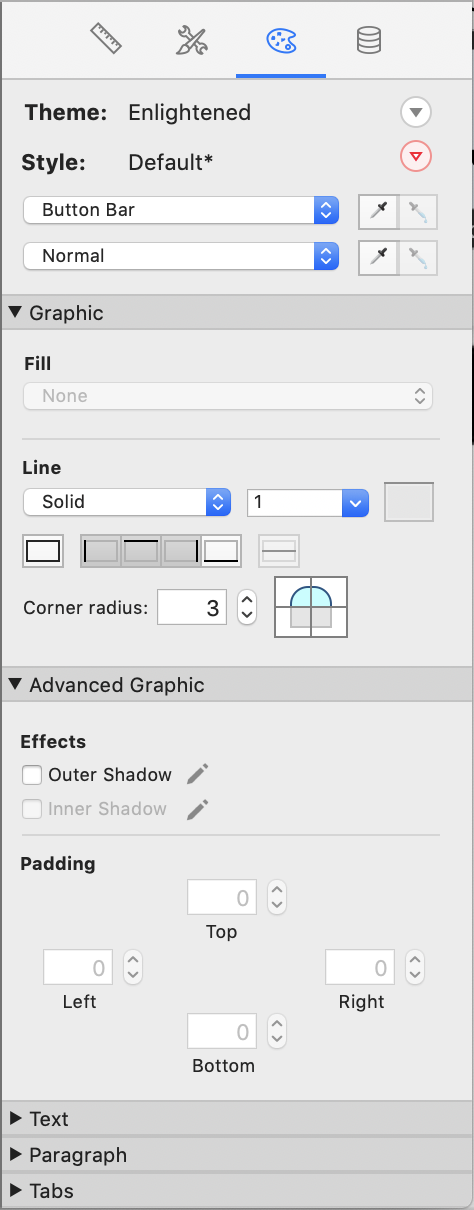
Getting the rounded corners to display took me a few tries to get working. I specified them and then looked at the results in browse mode but nothing changed. It finally dawned on me that I had to set a line border since none was set on the default theme. It makes sense now but at the time I was cursing FileMaker.
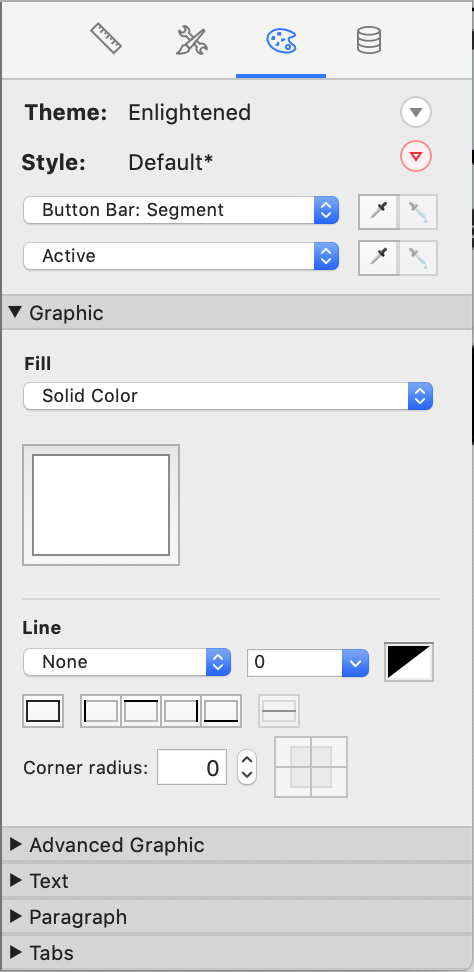
Clicking a second time on the Button Bar selects a segment and changes the Object Type in the Appearance area of the Inspector. You can also change the object type in the Inspector but I think it's important note there are two approaches here. On the button segments, I changed the "Active" state to a white fill. Prior to this change, the selected button on the Button Bar simply colored the text blue. To make it look more like a Tab Control tab, I needed it to match the fill color of the Slide Control fill.
I made a few other minor changes like removing the rounded corner on the upper left corner of the Slide Control. This allowed me to seemingly merge the Button Bar and the Slide Control when I nudged them almost on top of each other. I also placed a lighter line color on the Button Bar dividers because the default theme didn't match the color of the Slide Control fill. When I was done, it really did look like a Tab Control.
When defining the Button Bar, I recommend specifying one of the buttons as the Active Segment so it appears selected when the layout loads. Otherwise, the active Slide Control won't appear active when the layout loads.
The Downside
The downside to using a Button Bar and a Slide Control, versus a Tab Control, is more work. You have two objects to work with now, scripts, object naming and possibly interface work. It's not that hard but when compared to a simple Tab Control, it's infinitely more work. And, don't forget the additional process for selecting a pane in layout mode if the navigation dots are hidden.
What it comes down to is, if you don't need conditional tabs, just use a Tab Control. It's so much easier. Not only is it easier to program but it's far easier when making the inevitable changes down the line. I'm all about simplicity. Just think about what you are doing and what feature solves the problem best. I certainly wouldn't use this technique again unless the advantages outweighed the disadavntages.
Author:
John Mark Osborne
jmo@filemakerpros.com
www.databasepros.com
Example File (available to patrons at $5.00 per month): Download here if you are a patron
This blog is completely free. Please support it by clicking on one of the advertisers at the left side of the window or becoming a patron. Thanks so much!
|
|
Comments:
|
|
|
James Mastrianni
|
08/11/2020
|
|
|
That's a good FileMaker Hack! Thanks!!!!
|
|
|
Russell Haney
|
08/11/2020
|
|
|
Great trick, thanks John!
|
|
|
|